
You can still buy and use AI API credits without an international credit card.
One practical option is to choose an AI API platform that supports crypto payments.
You can use supported crypto assets such as USDT and USDC to fund an AI API balance, create an API key, and pay for model usage based on the selected model’s pricing and actual token consumption.
Technically, users are not purchasing the “API itself.” They are purchasing API credits or funding an account balance that can be used to make model requests.
This guide explains how to purchase AI API credits with crypto. Using BenPay AI API as an example, it covers how to fund your AI API USD Balance from an external wallet or the BenPay wallet, as well as the fees, supported assets, and model pricing to consider when choosing a platform.
Note: This article covers purchasing balance on a multi-model API platform directly with crypto. It does not cover using a crypto payment card to pay for an official OpenAI, Anthropic, or other model-provider account.
Supported assets, blockchain networks, minimum funding amounts, model pricing, and API compatibility may change. Always check the platform’s live interface before making a payment.
Why Do AI API Providers Often Require a Credit Card?
Most AI APIs are billed based on actual usage. Users typically need to add a payment method or purchase API credits first, after which charges are deducted based on input, output, and other Token usage.
For example, OpenAI currently explains that new API accounts use prepaid billing, where purchased credits are applied toward API usage. OpenAI also states that API Credits can be purchased with eligible standard credit or debit cards, while prepaid cards are not supported. The user’s region and the card issuer’s region must also meet the platform’s requirements. For details, see OpenAI’s prepaid billing documentation and credit card decline guidance.
Users may be unable to purchase official API credits directly if they:
- Do not have an international credit or debit card;
- Have a bank that restricts international online transactions;
- Have card payments declined by the bank or platform;
- Are located in an unsupported region, or use a card issued in an unsupported region;
- Use a prepaid card that the platform does not accept;
- Prefer to pay with crypto assets such as USDT or USDC.
If your project depends on the model provider’s full set of native features, continuing to use an officially supported payment method may still be the better option.
If your main goal is to access multiple models, configure third-party AI tools, or fund API usage without a credit card, a unified multi-model AI API that supports crypto payments may be worth considering.
If you have not applied for an official API key before, see How to Get an OpenAI API Key: Official Setup Guide and Multi-Model Alternatives.
How to Buy AI API Credits With Crypto
Using USDT or USDC to purchase AI API access usually does not mean sending crypto directly to OpenAI, Anthropic, or another model provider.
A more common flow is:
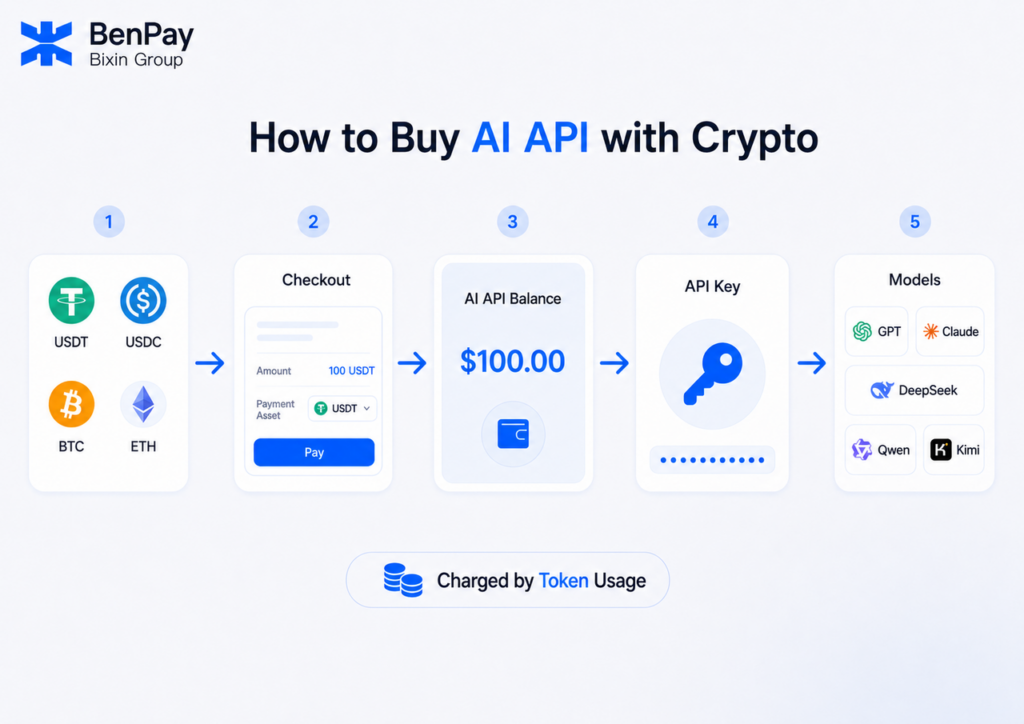
Crypto → AI API Platform Checkout → AI API Balance → API key → Token-Based Model Usage
You first create a top-up order on the AI API platform and pay with a supported crypto asset.
Once the payment is credited to the AI API balance, the funds can be used to call models currently supported by the platform. Charges are generally deducted based on the selected model and actual Token usage.
To better understand how input Tokens, output Tokens, and model pricing affect your bill, see How Is AI API Pricing Calculated? Token Pricing, OpenAI Costs, and Examples.
This payment method may be suitable for users who:
- Do not have an international credit card;
- Frequently encounter payment failures with official API providers;
- Already hold assets such as USDT, USDC, BTC, or ETH;
- Need access to multiple AI models;
- Use third-party tools that support custom API configuration;
- Want to manage API usage and costs in one place.
It is important to understand that an API key issued by a unified AI API platform is not an official API key issued directly by OpenAI, Anthropic, Google, or another model provider.
Supported models, pricing, API compatibility, and available features depend on the platform’s current model list and technical documentation.
To learn more about how unified API access works, see What Is a Unified AI API? How One API Key Can Access Multiple AI Models.
How to Choose an AI API Platform That Supports Crypto Payments
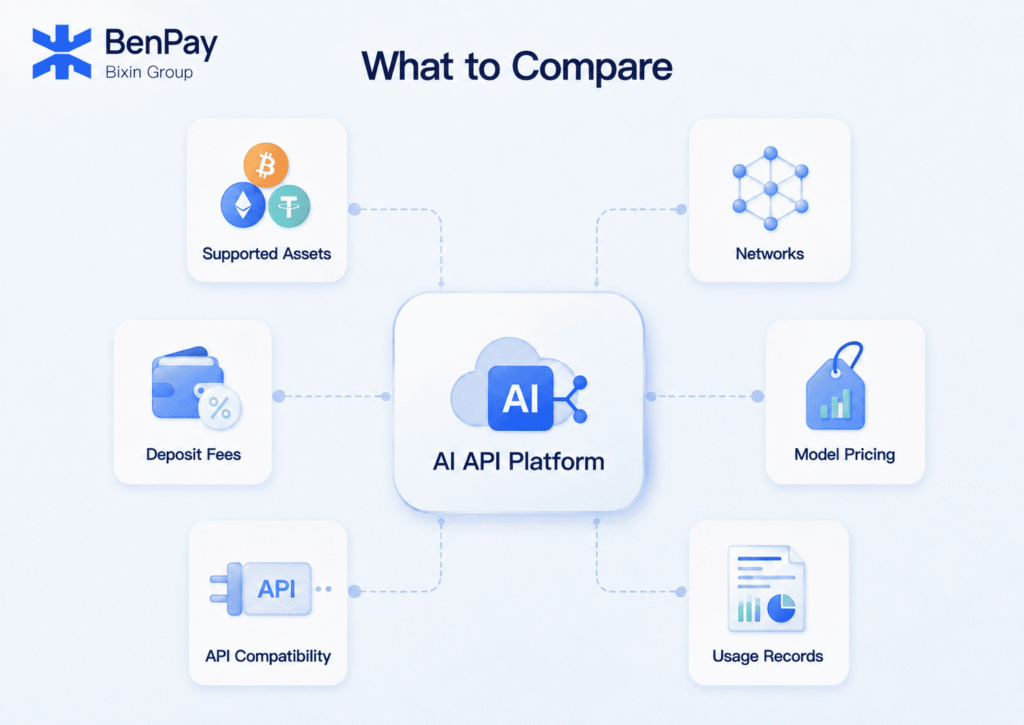
Some multi-model API platforms allow users to purchase API credits with crypto. However, supported assets, funding methods, fees, and model pricing vary across platforms. The table below compares BenPay AI API with common offerings from other similar platforms. Key factors to consider include supported assets and blockchain networks, funding fees, gas fees, model pricing, and API compatibility.
| Comparison | BenPay AI API | Other AI API Platforms |
|---|---|---|
| Supported Crypto Assets | Supports BUSD, USDT, USDC, BTC, ETH, and other assets currently available on the platform. Supported assets may vary by network. | Varies by platform. Some platforms support only selected stablecoins. |
| Funding Methods | Pay directly from an external wallet or exchange, or use the BenPay wallet. | Depends on the balance funding and payment methods supported by the platform. |
| Funding Fees | No additional BenPay platform fee for funding AI API balance when paying with BUSD. | Some platforms may charge a credit purchase fee or payment processing fee. |
| Gas and External Fees | When paying through the BenPay wallet and a sponsored transaction applies, the gas fee for that payment step is $0. External transfers, withdrawals, and cross-chain transactions may incur separate fees. | Depends on the network and payment flow. External transfers, withdrawals, and cross-chain transactions may incur separate fees. |
| Model Pricing | Some models currently display discounted pricing. Current discounts and per-Token rates should be checked on the live model page. | May use provider pricing, platform markups, or other pricing models. |
| API Access | Provides OpenAI-compatible and Anthropic-compatible endpoints. | Depends on the platform’s compatibility coverage. |
| Best For | Users who already hold multiple crypto assets, want flexible funding options, and care about funding costs and discounted pricing on selected models. | Choose based on model coverage, fees, supported payment assets, and API requirements. |
The information in this table was reviewed in August 2026. Funding methods, fees, and supported assets may change. Always check the latest platform information before making a payment. In this article, BUSD refers to the USD-pegged stablecoin on the BenFen blockchain. BenPay is built on the BenFen Chain.
If you already hold crypto assets such as USDT or USDC and want flexible funding options together with access to multiple models, BenPay AI API may be one option to consider.
Your final choice should still depend on the models you need, current pricing, and API compatibility. The next section explains how to fund your BenPay AI API step by step.
How to Fund Your BenPay AI API Balance With Crypto (Step-by-Step Guide)
What Is the AI API Balance?
The AI API balance is a USD-denominated balance used exclusively for BenPay AI API calls.
When you make a model request, the system deducts the corresponding cost from your AI API USD Balance based on the selected model’s pricing and actual Token usage.
There are several important restrictions:
- AI API USD Balance can only be used for BenPay AI API calls;
- It cannot be withdrawn;
- It cannot be transferred;
- It cannot be converted back into assets in your BenPay wallet;
- It cannot be used for other BenPay product modules.
For this reason, it is better to fund your balance according to your expected API usage rather than depositing significantly more than you need.
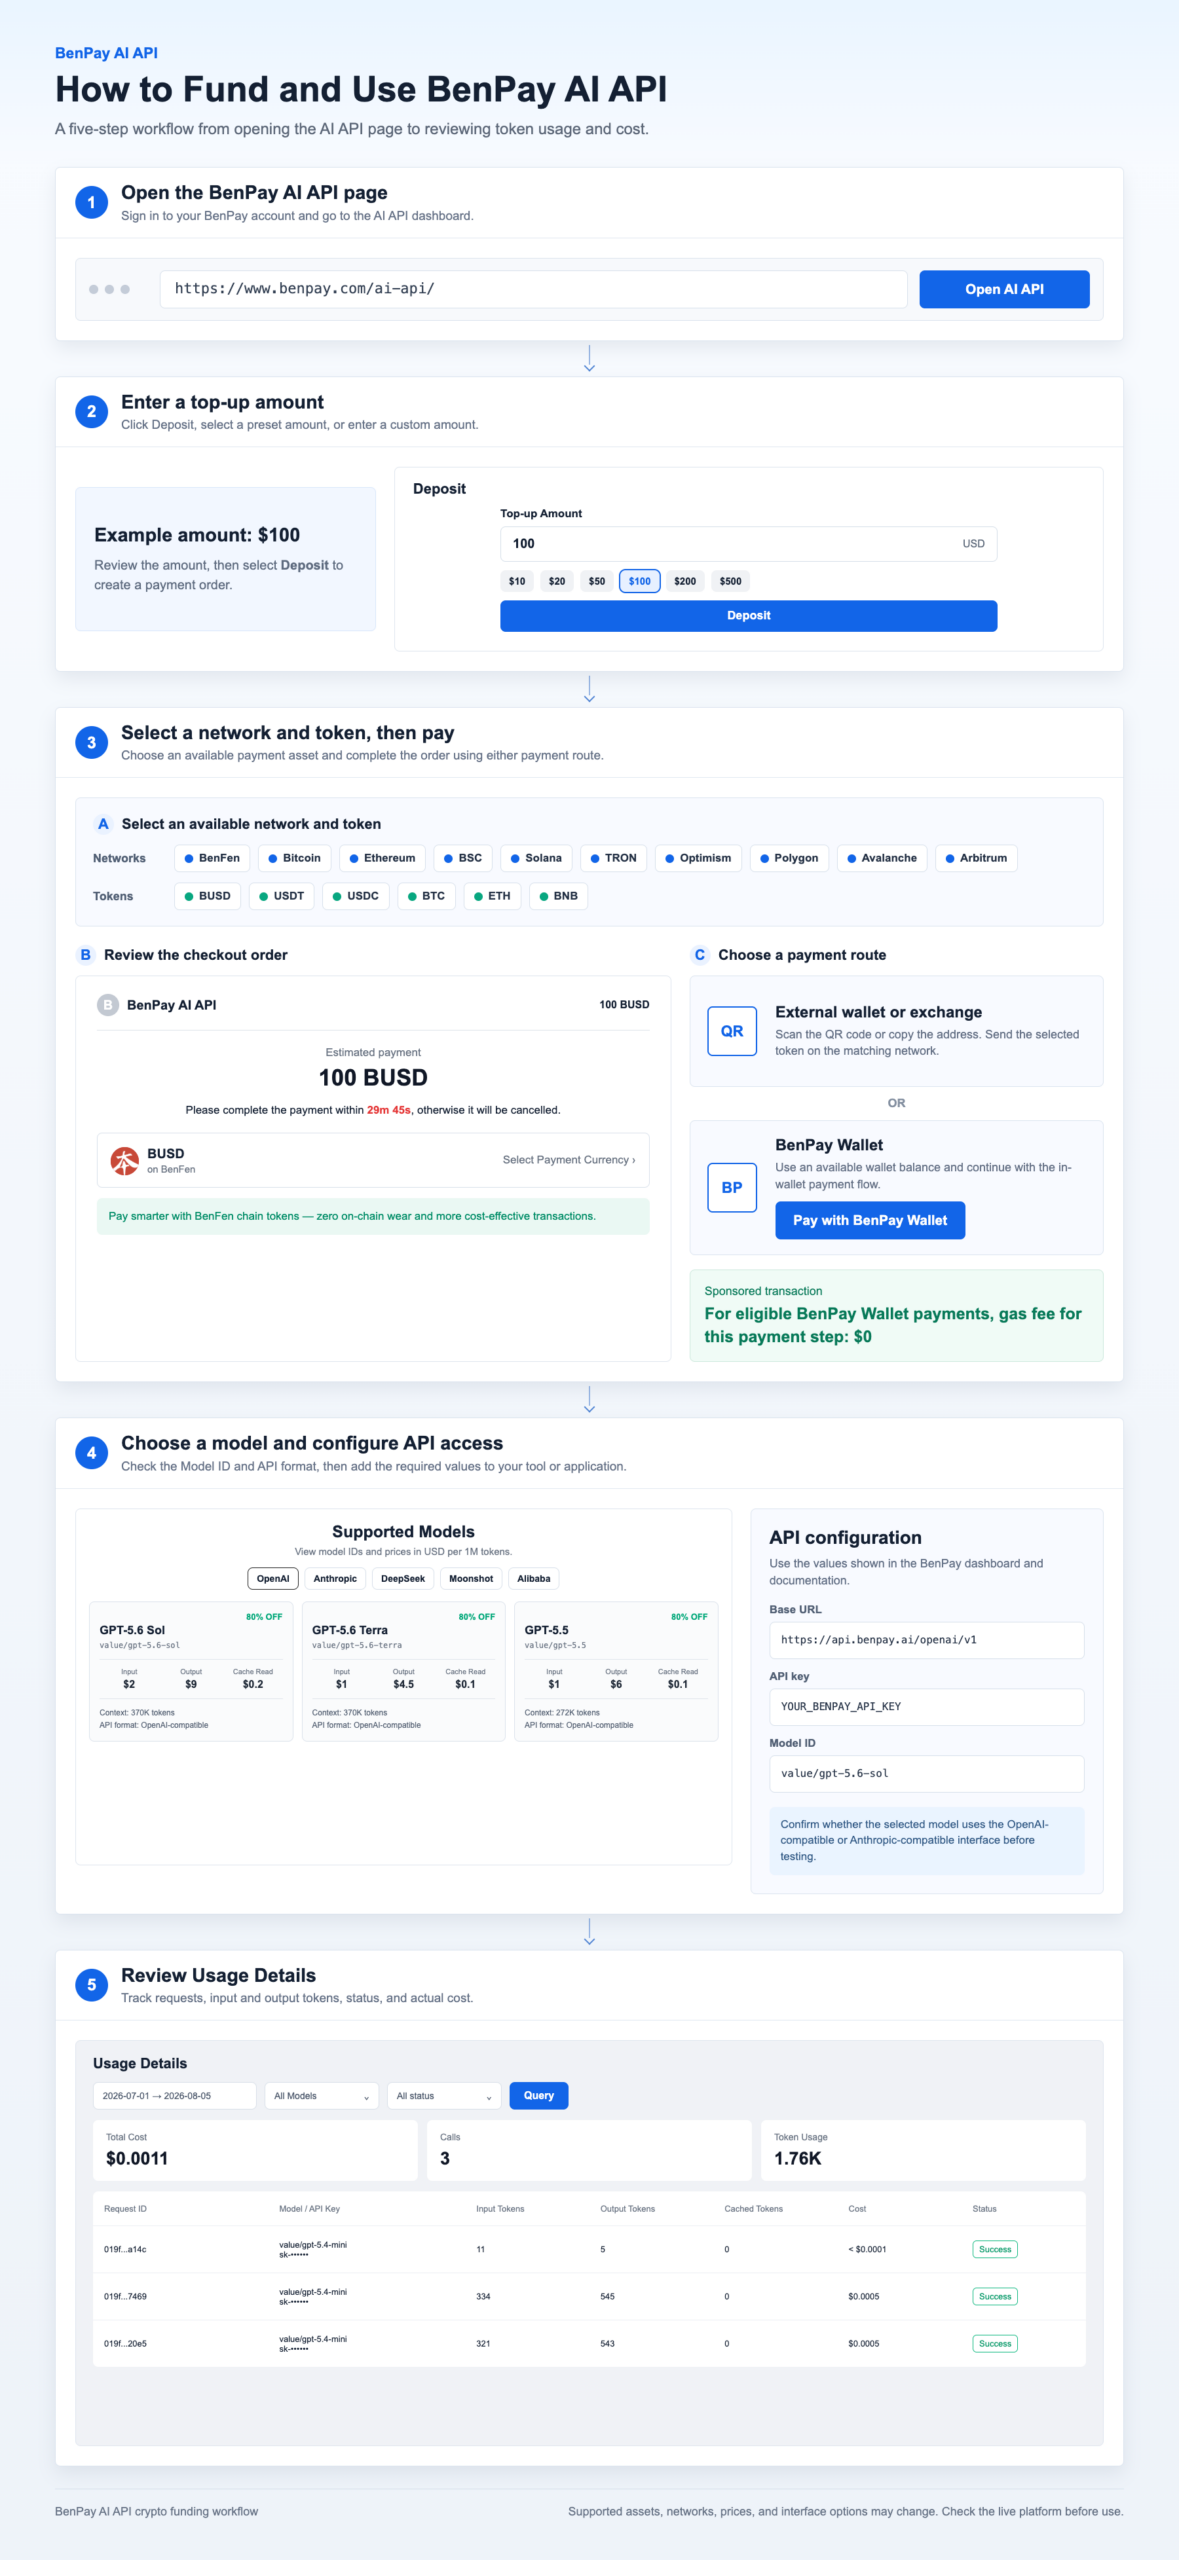
Step 1: Open the AI API Funding Section
Log in to your BenPay account and open the AI API page.
On the overview card, click Deposit to enter the AI API balance deposit section.
Step 2: Choose a Funding Amount
You can select one of the preset amounts shown on the page or enter a custom amount.
The current minimum custom funding amount is $1. Always follow the minimum amount shown on the live page.
After confirming the amount, click Deposit.
A confirmation window will appear. Review the amount and order details, then click Confirm and Proceed to Payment.
Step 3: Select a Network and Payment Token
Once the funding order has been created, you will be taken to the checkout page.
First select the blockchain network, then choose a payment asset supported on that network.
Different networks may support different assets, so always refer to the options displayed in the live checkout interface.
The checkout currently supports assets including BUSD, USDT, USDC, BTC, and ETH.
For example, when the BenFen network is selected, the page displays the tokens currently supported on that network together with their corresponding contract addresses.
Step 4: Choose a Payment Method
After selecting the network and token, you can pay from either an external wallet or your BenPay wallet.
Pay From an External Wallet or Exchange
You can scan the QR code displayed at checkout or copy the payment address and send the required asset from an external wallet or exchange.
Before sending the transaction, confirm that:
- The sending network matches the network selected at checkout;
- The token being sent matches the asset required by the order;
- The payment address has been copied correctly;
- The amount sent meets the order requirements;
- Your wallet has sufficient balance to cover network fees;
- If withdrawing from an exchange, the correct withdrawal network has been selected.
Payments from external wallets or exchanges may incur on-chain gas fees or exchange withdrawal fees.
If you first need to bridge assets onto the required network, additional cross-chain fees may also apply.
When using a particular asset or network for the first time, consider starting with a smaller funding amount.
After payment, keep the order details and transaction hash until the AI API USD Balance has been credited successfully.
Pay With the BenPay Wallet
If your BenPay wallet does not yet contain supported assets, you can fund it through an on-chain deposit or use the BenFen Bridge to transfer supported assets into BenPay such as BTC, USDT, and USDC.
Once the assets are available in your wallet, click Pay With BenPay Wallet and select the corresponding token.
When paying with BUSD, BenPay does not charge an additional platform fee for funding the AI API balance.
When using other assets such as USDT or USDC, the actual amount payable is based on the live quote displayed at checkout.
If the order qualifies for a sponsored transaction, the gas fee for this payment step is $0.
Step 5: Confirm Your AI API USD Balance
After a successful payment, the funded amount will be credited to your AI API USD Balance.
Return to the AI API page and confirm that the balance has been updated.
If the on-chain transaction has already been confirmed but the balance remains unchanged for an extended period, first verify the order amount, payment network, token, and transaction status.
You can then contact BenPay through an official support channel and provide the order details and transaction hash for further review.
Step 6: Create an API key and Configure a Model
Once your balance has been credited, open the API Keys page and create a BenPay AI API Key for the relevant tool or project.
If a third-party AI tool supports custom API configuration, you will typically need to enter:
- Base URL;
- BenPay AI API Key;
- Model ID for the target model.
Save the full API Key securely as soon as it is created.
Do not expose it in public code repositories, website front-end code, article screenshots, or public group chats.
Different models may support different endpoints and features. For detailed configuration instructions, refer to the BenPay AI API documentation.
It is a good idea to begin with a small number of non-sensitive test requests to verify model access, token usage reporting, and balance deductions before scaling up usage.
Step 7: Review API Usage Details
In the Token Usage section of the AI API overview card, click View Details to open the API usage records.
Requests can be filtered by time, model, or request status.
These records allow you to review actual Token consumption and adjust both your funding amount and model selection based on real usage.
For the complete top-up guide, see How to Top Up Your AI API Balance.
What Should You Check Before Buying AI API Credits With Crypto?
Before making a payment, complete the following checks:
- Only use payment addresses displayed on official platform pages;
- Verify both the payment token and blockchain network;
- When paying from an external wallet for the first time, consider starting with a smaller amount;
- Keep the order details and transaction hash until the balance has been credited;
- Compare live Token pricing for the specific Model ID you plan to use;
- Confirm that the required API interface and model features are supported;
- Never expose your account password or full API key.
If your requests contain personal information, customer data, trade secrets, or regulated data, you should also review the platform’s privacy policy, terms of service, logging policies, and data-processing practices.
Support for crypto payments does not mean anonymous usage, nor does it allow users to bypass regional policies, identity requirements, or applicable local laws.
Conclusion: You Can Buy and Use AI API Credits Without a Credit Card
Not having a credit card does not necessarily prevent you from using AI APIs.
One alternative is to use a multi-model API platform that accepts crypto payments and convert assets such as USDT or USDC into an API balance that can be used for model calls.
When choosing a platform, compare funding fees, supported assets, model pricing, API compatibility, and data-processing practices rather than looking only at whether “crypto payments are supported.”
For users who already hold assets such as USDT or USDC and want access to multiple models including GPT, Claude, and DeepSeek, BenPay AI API provides two funding routes: direct payment from an external wallet and payment through the BenPay wallet.
Its key characteristics include:
- No additional BenPay platform fee for funding AI API balance when paying with BUSD;
- When paying through the BenPay wallet and a sponsored transaction applies, the gas fee for that payment step is $0;
- Some models currently display discounted pricing, with multiple supported models accessible through compatible API interfaces.
Ready to get started? Eligible new users can visit BenPay AI API to claim free trial credits when available. Availability is limited, so check the live page for the latest details. You can then explore the currently supported models, discounts, and pricing, create an API key, and send your first test request. When you need additional balance, follow the AI API balance funding guide.